How to make this
Tags: meta webhosting unfinishedI'll write here how I made the website itself, which is probably a good first post. Also I am certainly going to forget how to do it if I don't write it somewhere.
Since this is the fist (real) post, it means the site isn't quite done, this post will probably change often to reflect that.
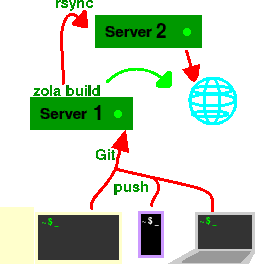
Now this isn't going to be 1:1 to my actual website, since my server topology looks kinda like the red path on the image on the right.
I do this because I already had a git server on the intermediate server, but I didn't really want to host from there, so I got instead another server that will just retrieve every so often the already built website and handle the rest on it's side, I do not recommend doing this unless you already have 2 servers laying around, otherwise you're just adding complexity for no real benefit.
With that in mind, this guide will assume the much simpler topology of simply having your git repository in the same place as your actual server, that is, following the green arrow.
Getting ready
First step would be installing git, nginx, and Zola
sudo apt-get install git nginx		# Debians
sudo xbps-install -S git nginx		# Void Linux


cargo install --locked --git https://github.com/getzola/zola
if you're in Void you can just install zola from xbps, otherwise leave zola building from source in the background, be warned it's going to take a long time.
don't install it as flatpak/snap, you might have problems later.
Now we want to create the main repo in the server, for that we will first isolate it into a separate git user, and make it reachable over ssh.
sudo useradd -m -s /bin/bash git -d /home/git/

sudo mkdir /home/git/.ssh/
sudo chmod 700 /home/git/.ssh/
sudo chown -R git:git /home/git/.ssh/
Now on each Client we generate a key.
ssh-keygen -t ed25519 -N "" -f ~/.ssh/gitkey
chmod 644 ~/.ssh/gitkey.pub
chmod 600 ~/.ssh/gitkey
cat ~/.ssh/gitkey.pub
Note down whatever cat prints, it should look something like this:
ssh-ed25519 AAAAC3NzaC1lZDI1NTE5AAAAIDyRriWwOC9c+3MuLoJ2IKeoYQv86ApxqaPJ3/t+UIK/ youruser@yourcomputer
Run the above on each client you want to give access, and note down each of the cat gitkey.pub outputs, those are your public keys.
Now to give the clients access to the git user we will add the public keys into the authorized_keys file on the server.
sudo su - git		#to log in into the git user manually
nano /home/git/.ssh/authorized_keys
Now paste all public keys at the end of the file, one per line.
after that is done you should be able to run this from any configured client.
ssh git@111.111.111.111
with that bunch of 1s being your server IP, After executing that you should be in git's shell.
Now that we have connectivity we want to actually host the git repo, to do that we need to create a new raw git repo using this (you can change "website" for whatever you want but make sure it ends with .git), on the server run:
git init --bare website.git
If you managed to do all of that so far great, you should be able to clone your repo with a command I don't remember right now, but we don't want that, that's too much of a pain in the butt, what we want is to be able to clone with a command that you can actually remember, we want to be able to do this:
git clone ServerGit:website.git
Simple isn't it?
Not only the website repo, your server is already a fully fledged git server, you can store all your projects there, all you need to do is init them like I did above.
Well to do that we need to edit each Client ssh config, so let's do just that, first open the config file.
nano ~/.ssh/config
and paste the following at the end, replace the 111. with your actual server IP.
Host ServerGit
	HostName 111.111.111.111
	User git
	IdentityFile ~/.ssh/gitkey
	IdentitiesOnly yes
If everything went right you shoud now be able to do all the git commands you know and love and it'll sychronize with the repo on the server.
git clone ServerGit:website.git
# edit as you wish
git commit -m "any commit"
git push
in addition to that, we can now ssh into the server with
ssh ServerGit
And there you have it, step 1 which is by far the longest is done, hopefully by now zola finished installing and you can start right away step 2;
Building (WIP...)
if you can see this on the web that means I got lazy documenting what comes next
Now that we have git up and running on the server, we need to rebuild the website after every git push, to do that we need to add a hook in website.git/hooks, ssh into the git user and create the hook.
The hook post-receive is simply a bash script that runs every time the server recieves an update, we'll tell git to tell zola to build from the source code, there is a problem however, we don't have the code just yet, the repo we created on the server only has the git internals, so we need to tell it to create a local git clone first.
nano ~/website.git/hooks/post-receive
chmod +x ~/website.git/hooks/post-receive
Then put in the nano a small bash script that automatically, checkouts the local git clone, then builds the webpage every time the code gets updated.
#!/bin/bash

REPO="/home/git/website.git"
SRC="/home/git/website"
OUT="/var/www/yourwebsite.com"
#Change these if you want a different path

if [ ! -d "$SRC/.git" ]; then
	git clone "$REPO" "$SRC"
fi

git --git-dir="$REPO" --work-tree="$SRC" checkout -f main

cd "$SRC"

TMP_OUT=$(mktemp -d)
zola build --output-dir "$TMP_OUT" --force

rsync -r --delete "$TMP_OUT"/ "$OUT"/
rm -rf "$TMP_OUT"
You'll notice I am instructing zola to build into a temp dir first and then syncing that to the website folder, that is because zola can get finicky with where it outputs.
server {
	listen 80;
	server_name website.com;
	root /var/www/website.com;
	index index.html;
}